How do I build a very simple android app you ask? It's easy, building a basic android application is not that hard. Making something really useful, cool and bug free, now that takes a good developer.
This is a brief tutorial will show you how to code a very basic two button android application (with a start button and a stop button).
You can use this code as an android project template or starting point for simple projects.
Two Button Application Use Case
A simple two button application, can be your starting point for various android projects. It can be useful for example when you have an application that starts and stops a service from the click of a button Watch for tutorial on this soon.
Note:This tutorial assumes you have completed the HelloWorld Tutorial in the Android docs and you are a little familiar with Eclipse and ADT. The tutorial is aimed at developers who are very new to Android.
Creating a two button app
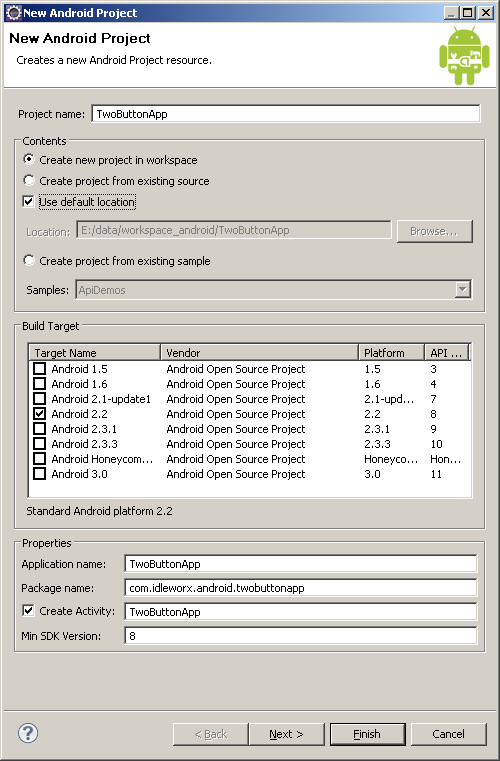
1) Create the project
In Eclipse create a new Android project and define the properties as shown below. Feel free to use your own package names.
2) Create a simple layout
For our main activity we're going to define a very basic layout consisting of one TextView and two Buttons (a start button and a stop button).
Modify your project/res/layout/main.xml file to this:
<?xml version="1.0" encoding="utf-8"?>
<LinearLayout xmlns:android="http://schemas.android.com/apk/res/android"
    android:orientation="vertical"
    android:layout_width="fill_parent"
    android:layout_height="fill_parent"
    >
<TextView
    android:layout_width="fill_parent"
    android:layout_height="wrap_content"
    android:text="This is a simple two button app. \r\n \r\n Tell your user what your app does here \r\n \r\n \r\n \r\n"
    android:padding="10dp"
    android:textColor="#FFFFFF"
    />
<Button
 android:id="@+id/buttonStart"
 android:layout_width="fill_parent"
 android:layout_height="wrap_content"
 android:text="Start"/>
<Button
 android:id="@+id/buttonStop"
 android:layout_width="fill_parent"
 android:layout_height="wrap_content"
 android:text="Stop"/>
</LinearLayout>
If you run your project in the emulator it should look like this

3) Adding onClickListeners to the buttons
In order for the buttons to actually do something useful, and to provide a template for where you can put future functionality, we'll need to define onClickListeners for each button.
Let's update the TwoButtonApp.java main activiy with the following code:
package com.idleworx.android.twobuttonapp;

import android.app.Activity;
import android.os.Bundle;
import android.util.Log;
import android.view.View;
import android.view.View.OnClickListener;
import android.widget.Button;
import android.widget.Toast;

public class TwoButtonApp extends Activity {

 private static String logtag = "TwoButtonApp";//for use as the tag when logging

 /** Called when the activity is first created. */
    @Override
    public void onCreate(Bundle savedInstanceState) {
        super.onCreate(savedInstanceState);
        setContentView(R.layout.main);

        Button buttonStart = (Button)findViewById(R.id.buttonStart);
     buttonStart.setOnClickListener(startListener); // Register the onClick listener with the implementation above

     Button buttonStop = (Button)findViewById(R.id.buttonStop);
     buttonStop.setOnClickListener(stopListener); // Register the onClick listener with the implementation above
    }

    //Create an anonymous implementation of OnClickListener
    private OnClickListener startListener = new OnClickListener() {
        public void onClick(View v) {
          Log.d(logtag,"onClick() called - start button");
          Toast.makeText(TwoButtonApp.this, "The Start button was clicked.", Toast.LENGTH_LONG).show();
          Log.d(logtag,"onClick() ended - start button");
        }
    };

    // Create an anonymous implementation of OnClickListener
    private OnClickListener stopListener = new OnClickListener() {
        public void onClick(View v) {
         Log.d(logtag,"onClick() called - stop button");
         Toast.makeText(TwoButtonApp.this, "The Stop button was clicked.", Toast.LENGTH_LONG).show();
          Log.d(logtag,"onClick() ended - stop button");
        }
    };


    @Override
 protected void onStart() {//activity is started and visible to the user
  Log.d(logtag,"onStart() called");
  super.onStart();
 }
 @Override
 protected void onResume() {//activity was resumed and is visible again
  Log.d(logtag,"onResume() called");
  super.onResume();

 }
 @Override
 protected void onPause() { //device goes to sleep or another activity appears
  Log.d(logtag,"onPause() called");//another activity is currently running (or user has pressed Home)
  super.onPause();

 }
 @Override
 protected void onStop() { //the activity is not visible anymore
  Log.d(logtag,"onStop() called");
  super.onStop();

 }
 @Override
 protected void onDestroy() {//android has killed this activity
   Log.d(logtag,"onDestroy() called");
   super.onDestroy();
 }
}
Notes
- As you can see, each button (or any resource for that matter) can be retrieved by the id was associated with in the layout:
@+id/buttonStart

can be retreived with:

Button buttonStart = (Button)findViewById(R.id.buttonStart);
- We have attached two anonymous OnClickListeners() to each of our two buttons
- Each listener displays a simple Toast (a brief message to the user).
- Logging is very important especially during debugging, so make sure you use it where ever you need
- Not the logtag variable defined in the very top. It's a quick shortcut to save time when logging statements in your app with the Log.X methods. I usually use the same name as the class name and use the Create Filter option in the LogCat view to filter my code out.
- For easier debugging I've added logging of all the other lifecycle methods in the Activity. When you do debugging of your apps it's very important to understand the lifecycle of an android app, and even more important to see how it's called in relation to your code.
So this is it, Introduction to Android 101. You should now have a very basic android app running.
For reference here is how your AndroidManifest.xml file should look (you should not have had to modify this file so far if you have followed this tutorial):
<?xml version="1.0" encoding="utf-8"?>
<manifest xmlns:android="http://schemas.android.com/apk/res/android"
      package="com.idleworx.android.twobuttonapp"
      android:versionCode="1"
      android:versionName="1.0">
    <uses-sdk android:minSdkVersion="8" />

    <application android:icon="@drawable/icon" android:label="@string/app_name">
        <activity android:name=".TwoButtonApp"
                  android:label="@string/app_name">
            <intent-filter>
                <action android:name="android.intent.action.MAIN" />
                <category android:name="android.intent.category.LAUNCHER" />
            </intent-filter>
        </activity>

    </application>
</manifest>